AI Image upscalers like ESRGAN are indispensable tools to improve the quality of AI images generated by Stable Diffusion. It is so commonly used that many Stable Diffusion GUIs have built-in support.
Here, we will learn what image upscalers are, how they work, and how to use them.
Table of Contents
Why do we need an image upscaler?
The default image size of Stable Diffusion v1 is 512×512 pixels. This is pretty low in today’s standard. Let’s take the iPhone 12 as an example. Its camera produces 12 MP images – that is 4,032 × 3,024 pixels. Its screen displays 2,532 x 1,170 pixels, so an unscaled Stable Diffusion image would need to be enlarged and look low quality.
To complicate the matter, a complex scene generated by Stable Diffusion is often not as sharp as it should be. It struggles with fine details.
Why can’t we use a traditional upscaler?
You can, but the result won’t be as good.
Traditional algorithms for resizing images, such as the nearest neighbor interpolation and Lanczos interpolation, have been criticized for using only pixel values of the image. They enlarge the canvas and fill in the new pixels by performing mathematical operations using only the image’s pixel values. However, if the image itself is corrupted or distorted, there’s no way for these algorithms to fill in missing information accurately.
How does AI upscaler work?
AI upscalers are neural network models trained with massive amounts of data. They can fill in details while enlarging an image.
In the training, images are artificially corrupted to emulate real-world degradation. The AI upscaler model is then trained to recover the original images.
A massive amount of prior knowledge is embedded into the model. It can fill in the missing information. It’s like humans don’t need to study a person’s face in great detail to remember it. We mainly pay attention to a few key features.
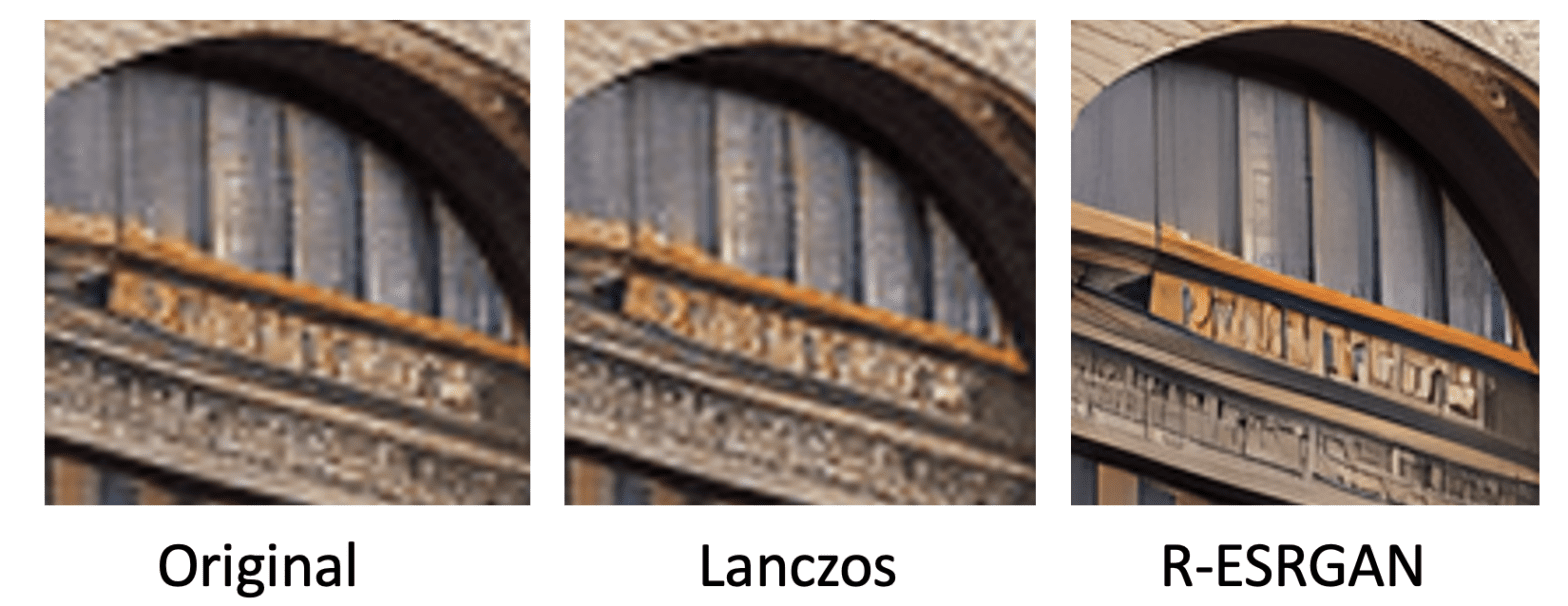
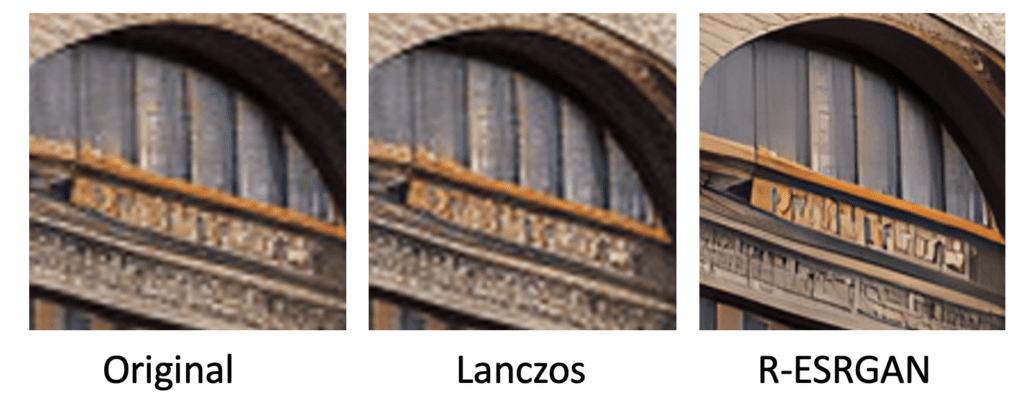
Below is an example of comparing the traditional (Lanczos) and AI (R-ESRGAN) upscalers. Because of the knowledge embedded in the AI upscaler, it can enlarge the image and recover the details simultaneously.
How to use an AI upscaler?
Let’s go through how to use an AI upscaler in AUTOMATIC1111 WebUI for Stable Diffusion.
See the Quick Start Guide for setting up AUTOMATIC1111 GUI.
Go to the Extras page (I know the name is confusing), and select Single Image.
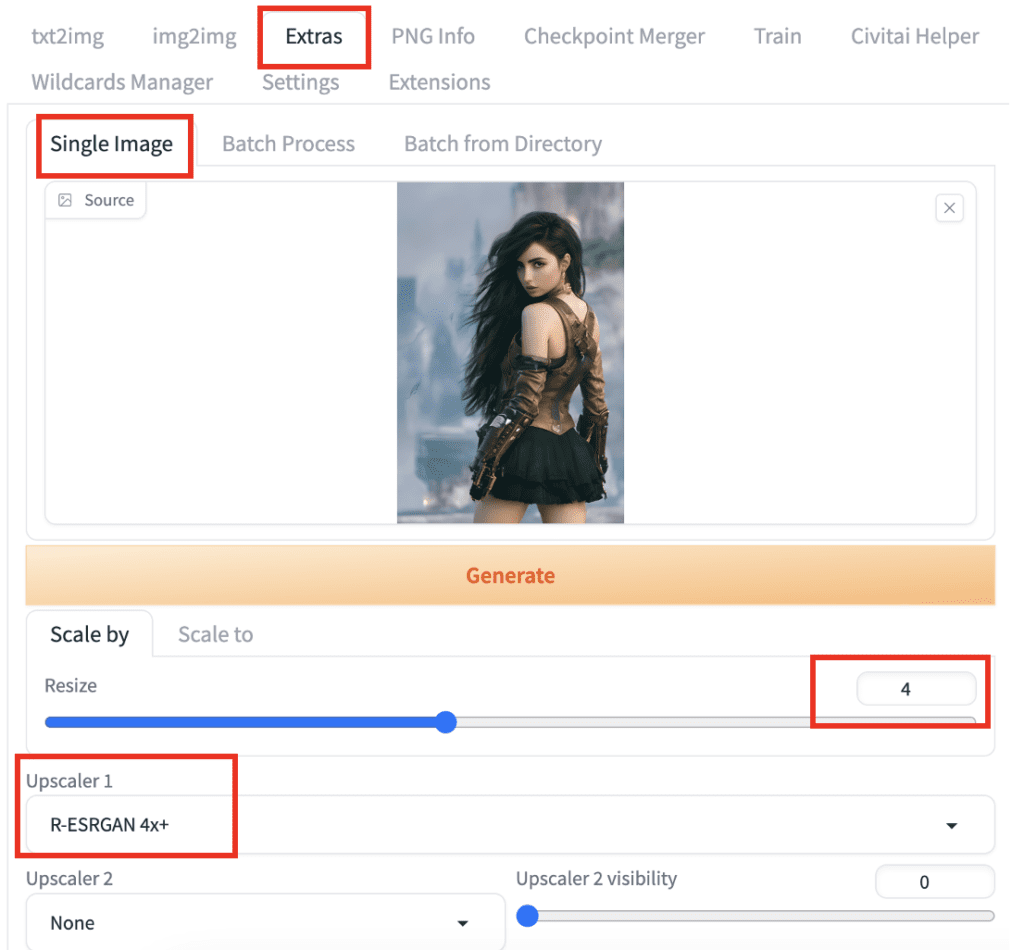
Upload the image you want to upscale to the source canvas.
Set the Resize factor. Many AI upscalers enlarge images 4 times natively. So 4 is a good choice. Set it to a lower value, like 2, if you don’t want the image to be that big.
If your image is 512×512 pixels, resizing 2x is 1024×1024 pixels, and 4x is 2048×2048 pixels.
Select R-ESRGAN 4x+, an AI upscaler that works for most images.
Press Generate to start upscaling.
When it is done, the upscaled image will appear in the output window on the right. Right-click on the image to save.
AI upscaler options
Let’s go through a few notable AI upscaler options.
LDSR
Latent Diffusion Super Resolution (LDSR) upscaler was initially released along with Stable Diffusion 1.4. It is a latent diffusion model trained to perform upscaling tasks.
Although it delivers superior quality, it is extremely slow. I don’t recommend it.
ESRGAN 4x
Enhanced Super-Resolution Generative Adversarial Networks (ESRGAN) is an upscaling network that has won the 2018 Perceptual Image Restoration and Manipulation Challenge. It is an enhancement to the previous SRGAN model.
It tends to retain fine details and produce crisp and sharp images. ESRGAN is the base model of many other upscalers.
R-ESRGAN 4x
The Real-ESRGAN (R-ESRGAN) is an enhancement to ESRGAN and can restore a variety of real-world images. It models various degrees of distortion from the camera lens and digital compression.
Compared to ESRGAN, it tends to produce smoother images.
R-ESRGAN performs best with realistic photo images.
Other Options
There’s a good comparison in this post to check out other options.
R-ESRAGN is a good choice for photographs or realistic paintings. Anime images require upscalers specifically trained to recover animes.
Visit the Open model database to find and download more upscalers.
Installing new upscaler
To install a new upscaler in AUTOMATIC1111 GUI, download a model from the Open model database and put it in the folder.
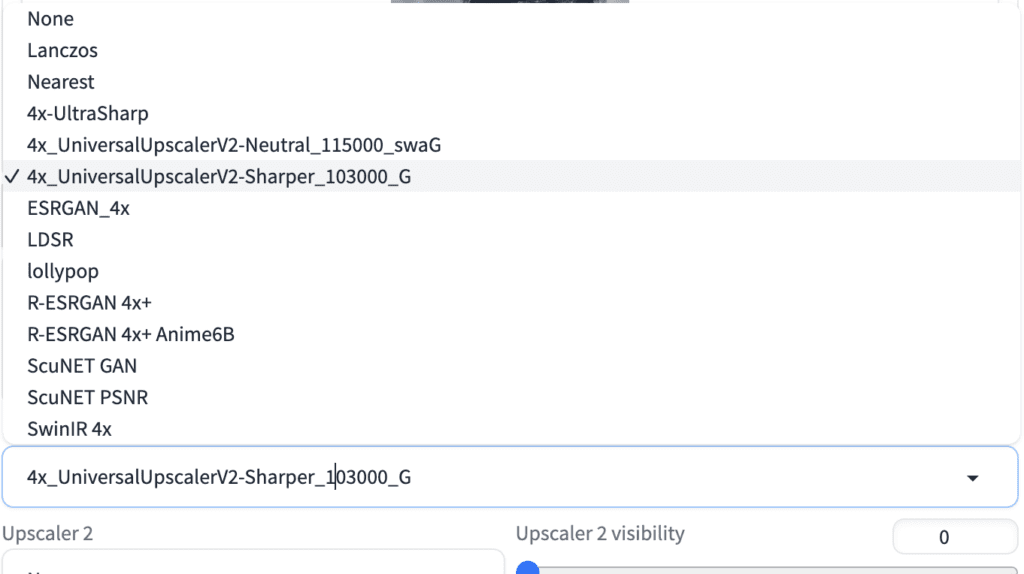
stable-diffusion-webui/models/ESRGANRestart the GUI. Your upscaler should now be available for selection in the upscaler dropdown menu. Below is what you should see after installing the Universal Upscaler V2.
The following models are good general-purpose upscalers.
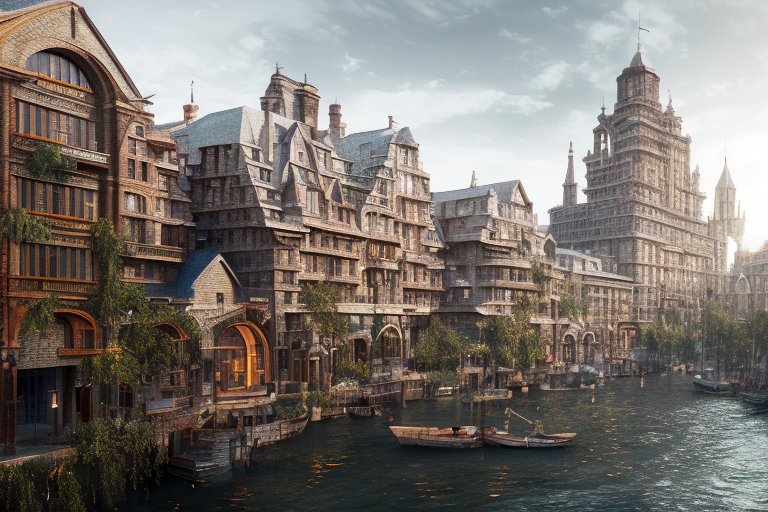
Example of upscaled images
Below is an example of a complex scene upscaled using R-ESRGAN. Enlarge and switch between them to observe the difference. Compare them on computer and cell phone screens to see the difference.
Enhancing details with SD upscale
Using an upscaler alone is not ideal. If you have stable diffusion in hand, why not adding it to your upscaler workflow?
SD Upscale is a script that comes with AUTOMATIC1111 that performs upscaling with an upscaler followed by an image-to-image to enhance details.
Step 1. Navigate to Img2img page.
Step 2. Upload an image to the img2img canvas.
(Alternatively, use Send to Img2img button to send the image to the img2img canvas)
Step 3. In the Script dropdown menu at the bottom, select SD Upscale.
Step 4. Set Scale factor to 4 to scale to 4x the original size.
Step 5. Set denoising strength to between 0.1 and 0.3. The higher it is, the more the image will change. (You should experiment with this)
Step 6. Set the number of sampling steps to 100. Higher steps improve details. (You should experiment with this)
Step 7. You can use the original prompt and the negative prompt. If you don’t have one, use “highly detailed” as the prompt.
Step 8. Press Generate.
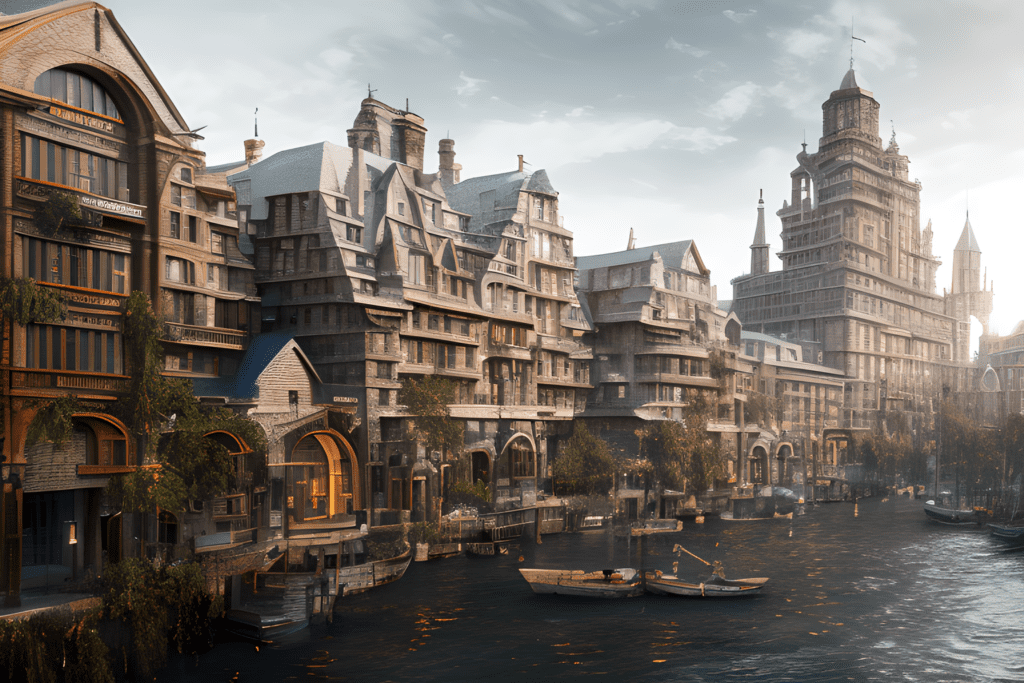
Below is a comparison of adding an additional image-to-image with the SD Upscale script.
- Left: Universal Upscaler v2 to 4x.
- Right: SD Upscale with Universal Upscaler v2 to 4x, prompt “highly detailed”, denoising strength 0.3 and 100 sampling steps.
The SD Upscale script helps to improve details and reduce upscaling artifacts.
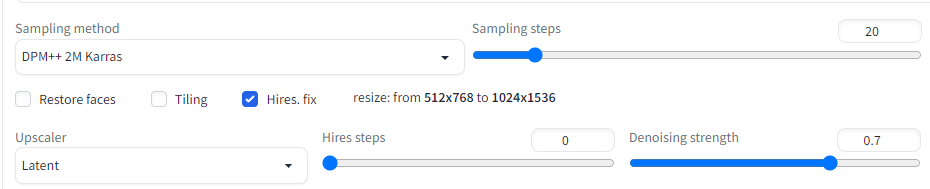
Hires Fix in txt2img page
You can optionally upscale every image generated on the txt2img page. To do so, you simply need to check the Hires. fix.
Additional options will appear under the checkbox. The options are similar to those using the SD Upscale script.
Personally, I don’t use Hires fix much because it slows down image generation. Instead of upscaling all images, I would rather only upscale the ones I am going to keep.
Once you see a good image, you can send it to img2img for SD upscaling.
Learn about a new upscaling method for Stable Diffusion: ControlNet Tile Upscale.
Thank you so much for your info. I love it. Still working my way through your tuts.
“Personally, I don’t use Hires fix much because it slows down image generation. Instead of upscaling all images, I would rather only upscale the ones I am going to keep.”
I’ve only been using SD for about three days, figuring things out, but it doesn’t seem to me that hires and upscaling are much the same. Hires ends up making major changes to the image that post-process upscaling doesn’t; it adds details that p-p upscaling doesn’t. That can be good, that can be bad, it’s hard to say until you see what it does.
From the A1111 features page: “In other words, this is equivalent to generating an image in txt2img, upscaling it via a method of your choice, and running a second pass on the now upscaled image in img2img to further refine the upscale and create the final result.” Which is a very different thing– you’re doing a whole extra layer of diffusion on the results. Not sure if that’s doable with img2img natively, I keep getting issues if I limit to mask area.
So if you have a great pic, you can do a p-p upscale, but be very limited in terms of new details. Or, you can load the image and re-run with hires, but there’s no guarantee that a good pic before hires is a good pic after, nor that a bad pic with hires isn’t a good pic after– the changes can be that significant.
Apologies if I’m missing something– at this level of experience, it’s very likely.
you can try controlnet upscale to add details.
https://stable-diffusion-art.com/controlnet-upscale/
hi
i´m focusing on AI-animations in Automatic1111/Deforum.
Want to end up with 1920×1080 PNG-sequences for comtinued editing in Premiere Pro,
so what would be the best way to go about step by step for quality without to much image distortions/inconsistencies?
I´d rather crop than scale up image image stills/sequences.
i use guided images a lot and batch process in Extras.
-txt2img: stick with initial 512×512 ( i´ve done 576×768 ) or other recommendations?
upscale in “extras”? hires fix?outpainting?
To avoid animations getting blurry over time and losing details,Antiblur/strength schedule/noise multiplier schedule:fixed value or scheduled?
grateful for input.
you will need to stay with 512 on at least one side for SD 1.5. Upscaling in the extra extab doesn’t use SD to upscale so the motion can stay the same.
Hi res fix will cause inconsistency in animation. But deforum is not too consistent anyway so you can give it a try.
thanks for info!I´m using 1.6, so 768×512 for landscape format would be preferable starting point.
thanks for info!I´m using 1.6, so 768×512 for landscape format would be preferable starting point i suppose?
Hi,
I tried to download the links you provided for ESRGAN and R-ESRGAN but there is no PTH file? Could you please explain how one would go about downloading these two models to add to V1.5 Automatic?
Also, thank you for all the great write-ups!
I can’t remember, if I download from civitai I get a files named “add-detail-xl.safetensors”, “more_details.safetensors”, “xl_more_art-full_v1.safetensors”, … do I just change the path ending to .pth?
Hi
Hi thanks for great explanations!I´m trying to figure out good/best method for upscaling AI-videos /image sequences created in Deforum. Recommendations?
Topaz Video AI is amazing with genuine video, not tried it with AI Gen video though.
You can start with 4x ultrasharp
Thanx! For animations would you drag in the low res png-stills sequence into the extras/batch process-tab and generate for upscaling?I intend to continue edit png-seqs in premiere pro/after effects.
Yes sounds reasonable.
Hi, thanks for your sharing. You mentioned that many AI upscalers can enlarge images by 4x. Would you mind try and add AnyRec AI Image Upscaler?It is a free 8x image upscaler (up to 3000*3000px). You can try at https://www.anyrec.io/image-upscaler/
hi, thanks for the introduction – I tested a dozen of them including the ones your used. First, R-ESRGAN does not exist, where did you get it? Maybe you meant Real-ESRGAN?
SwinIR is by far the best of them all. Real-ESRGAN comes just behind, then the rest is all crap far behind.
Yes R is real.
They are good at different kind of images and effects.
Thanks for your generous!,This’s a very cool website about Stable Diffusion user 🙂
Thanks for reading!
Challege quickly becomes available VRAM
Hi, I tried to install SwinIR 4x as it doesn’t show up in the default options, I downloaded version 003_realSR_BSRGAN_DFOWMFC_s64w8_SwinIR-L_x4_GAN then renamed as SwinIR 4x and put it in stable-diffusion-webui/models/ESRGAN but it gives KeyError: ‘trunk_conv.weight’ al try to upscale
I am getting the exact same error with a different 4X model I have downloaded. Any idea how to resolve? Were you able to resolve this?
Nice! At what point would you be able to inpaint and still maintain details? Is there a certain point when to fit inpainting into upscaling with as much detail on the image you want to achieve?
The upscaling process can be done as many times as you want. You can add detail as much as you want when “zooming in”. The challenge is usually losing global coherence.
Did I can upscale 512×512 into 16:9 format or do i have to do something other than that?
You can do one of the following
1. Upscale and crop to 16:9.
2. Extend to 16:9 with outpainting (there’s a tutorial on this site). Then upscale.
When i try to use this with “batch from directory” it just does nothing? Under the preview window it says “loading..” but in the command window i see that there is nothing happening 🙁
Hi, I haven’t used the batch function. Please go to A1111’s github page to file a bug if can reproduce it.
You are welcome!
Great tutoriel of yours
1st time i don’t get badly lost with technical explanations
Thanks a million time
I have been messing with Stable Diffusion and the Automatic web gui for the past 2 weeks, and have been having a hard time finding good documentation and what all the different settings in the GUI do. Thanks for writing a great article that’s clear and right to the point. This tutorial is 10X better than what ChatGPT could produce!
You are welcome. I take your last sentence as a compliment! 🙂